3 Rehearsal-Ready Hairstyles for Natural Curls
March 12, 2019
Tired of tangled or flyaway tresses? Try these three easy, flattering, class-ready styles to keep your natural curls and coils out of your face.
Consultant: Angela Huff for Mark Edward Inc.
Half-Up(side Down)

Photo by Nathan Sayers
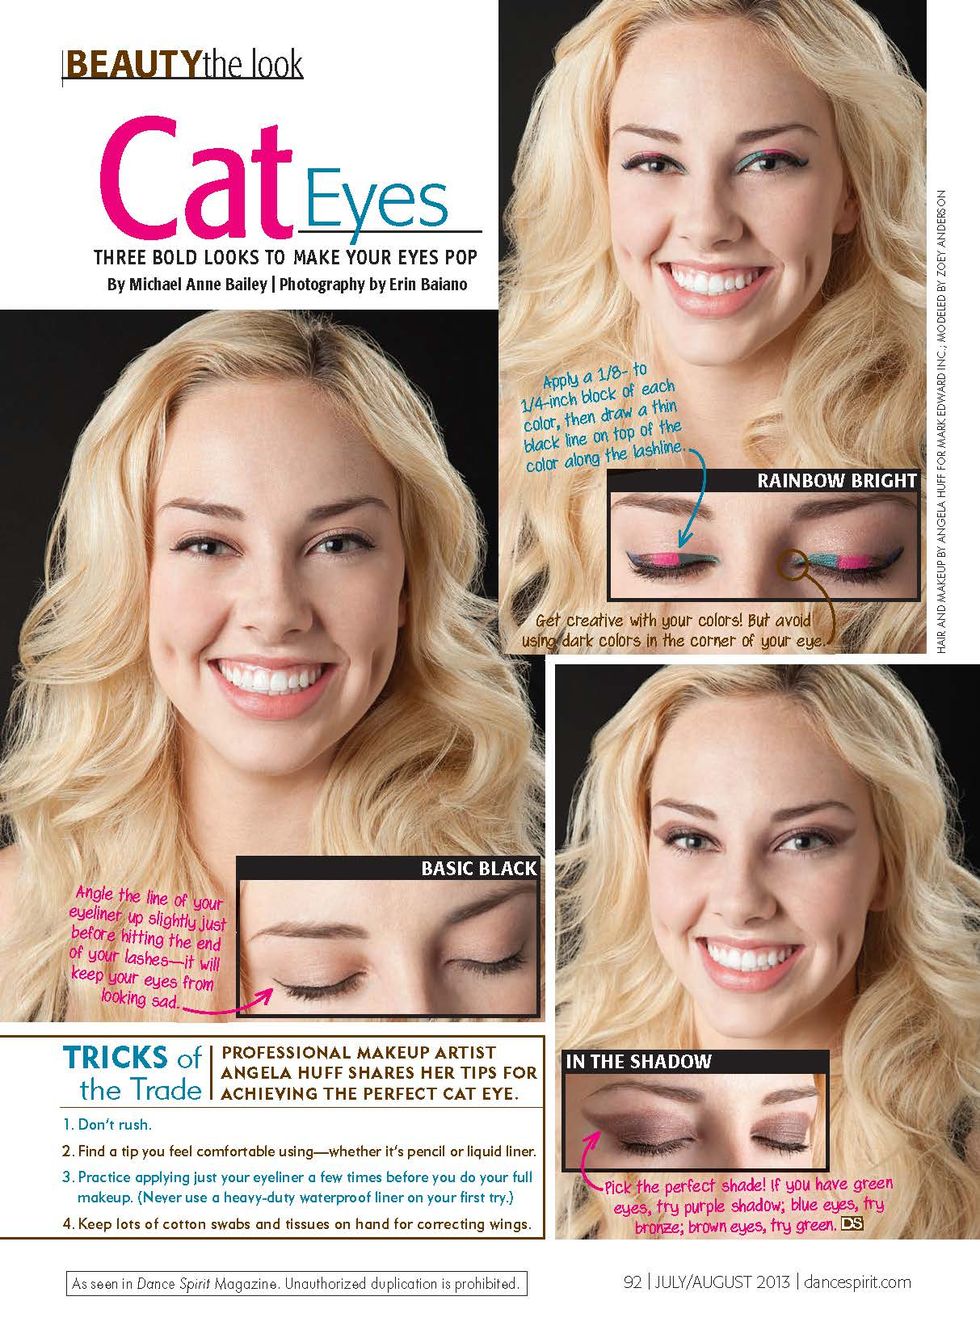
- Take a spray bottle filled with water and generously spritz your hair.
- Comb through your hair with your fingers and a wide-tooth comb, but keep the ends curly.
- Using the tops of your ears as your guide, make a part horizontally across the back of your head and separate your hair into two sections.
- Fasten the lower section with a clip or elastic to keep it out of the way.
- Brush through the top section with your fingers to catch any stray strands and smooth it out.
- Position the top section at the crown of your head. Take an elastic (or two) and securely fasten the hair. Tighten and tease to your liking.
- Remove the clip or elastic from the lower section. Spritz it with a little more water.
- Comb through the back section with your fingers once more, leaving it full and curly.
Ponytail—With a Twist

Photo by Nathan Sayers
- Spritz your entire head with water, focusing on the ends to make sure they don’t get tangled.
- Using your fingers, comb through your dampened hair, but avoid the ends so they stay curly.
- Part your hair where you normally would, and section it off into two parts. Secure one section with an elastic and leave it until the last step.
- Grab two small locks of hair from where you’d like the roll to be positioned.
- Slowly twist each piece of hair around the other. With each twist, keep grabbing and adding a little bit of hair, like you would for a French braid. The twisted portion of hair should resemble a rolled rope braid, and it’ll get bigger—depending on your hair’s curl pattern, the hair will puff up. Make sure to keep the twists tight by holding the hair with more tension.
- Continue rolling until you reach where you’d like your ponytail to begin. Secure everything (the roll and the remaining hair for the ponytail) with a pin or a strong clip. Repeat the same process on the other side.
- Once the other side is completed, gather both sections and combine them into either a high or low ponytail, depending on your preference. Secure with an elastic.
Fauxhawk

Photo by Nathan Sayers
- Have three elastics around your wrist, ready to go.
- Spritz your hair with water and section it into three parts with a wide-tooth comb—one near the top of your head (exactly like the first hairstyle), one in the middle, and one near the nape of your neck. Because this style is tight, where you part your hair is key. Make sure your parts are even, since they’ll be showing.
- Clip the top section so it stays out of the way, making sure to define the part that separates it from the middle section. Do the same for the middle section, defining the part that separates it from the lowest section. Clip each remaining section.
- Using a boar-bristle brush, start styling the top section. (Don’t use a plastic brush—it can rip your hair.) Spritz the hair around the hairline and smooth it over with the brush, making sure there are no tangles. Brush all the hair so that you’re holding it tightly, and secure it with an elastic.
- Repeat this for the middle and lower sections, making sure to leave the ends curly. Once each section is secured with an elastic, tease out the ends so that they form a Mohawk.
A version of this story appeared in the March 2019 issue of
Dance Spirit with the title “Naturally Chic.”